BrowserAct Click Element Node— Beginner's Guide

Learn to use BrowserAct's Click Element node for browser automation. Master natural language descriptions, best practices, and click workflows without code.
Master BrowserAct's Click Element node to automate precise clicks on any visible element. Use natural language descriptions to identify buttons, links, and interactive elements without writing code. Perfect for forming submissions, navigation, and triggering page events. Learn features, rules, and best practices to build powerful click automation workflows.
What is the Click Element Node?
The Click Element Node executes precise click actions on visible elements within the current viewport based on your natural language description. Simply describe what you want to click (like "blue search button in the upper right corner"), and the system automatically detects and clicks the element. This node simulates human clicking behavior, triggers page navigation or events, and requires no code.
When Should You Use It?
Use the Click Element Node if you need to:
· Navigate to the next page by clicking buttons (e.g., click a login button to enter the user dashboard)
· Trigger search queries by clicking search buttons in the page header
· Submit forms or interact with popup menus (e.g., click "Submit" to complete data entry)
How to Set Up a Click Element Node (Step by Step)
1.Insert the Node
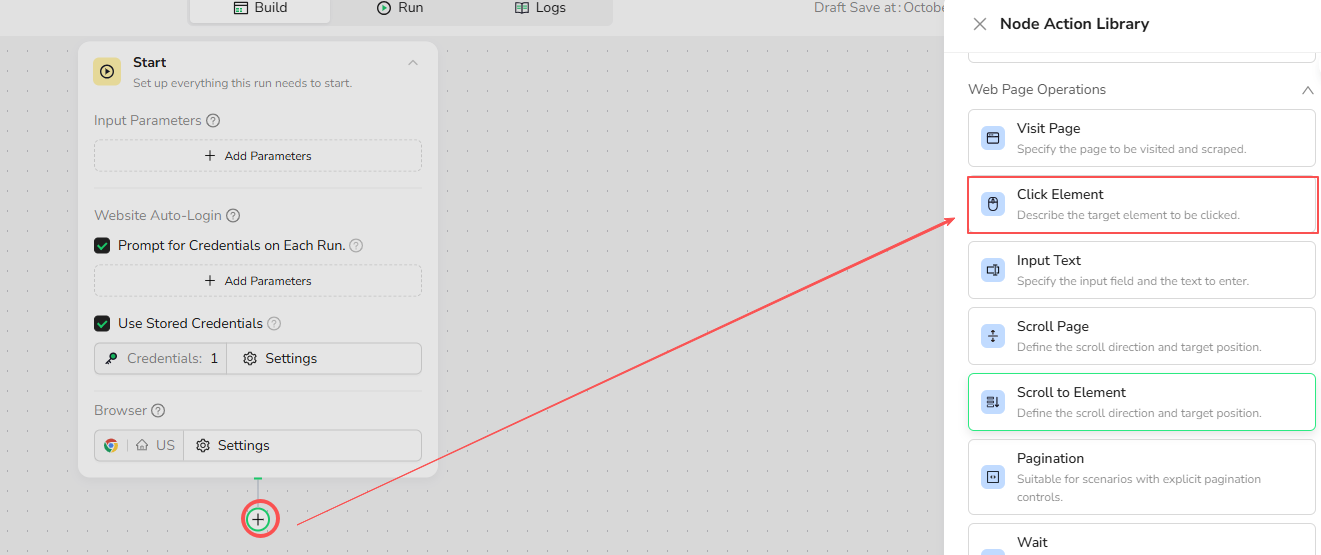
Click the + button in your workflow, then select "Click Element Node" from the node library.

2.Describe the Target Element
Description:
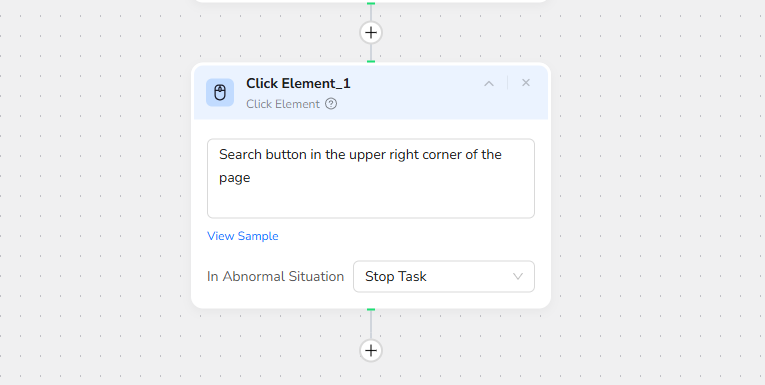
Describe the element's location and characteristics.
Correct Example:
- Search button in the upper right corner of the page
- Submit button at the bottom of the form
- Blue 'Continue' button on the right side
Incorrect Examples:
- Click the Login button
- Click the Submit button
- Click Search button in the upper right corner of the page, then click the confirmation button

3.Handle Errors (Optional)
In Abnormal situations:
Select "Stop Task" from the dropdown to halt the workflow if the element cannot be found or clicked.
4.Connect with Other Nodes
Place the Click Element node after Visit Page nodes and before data extraction nodes.
Examples:
Clicking a Search Button
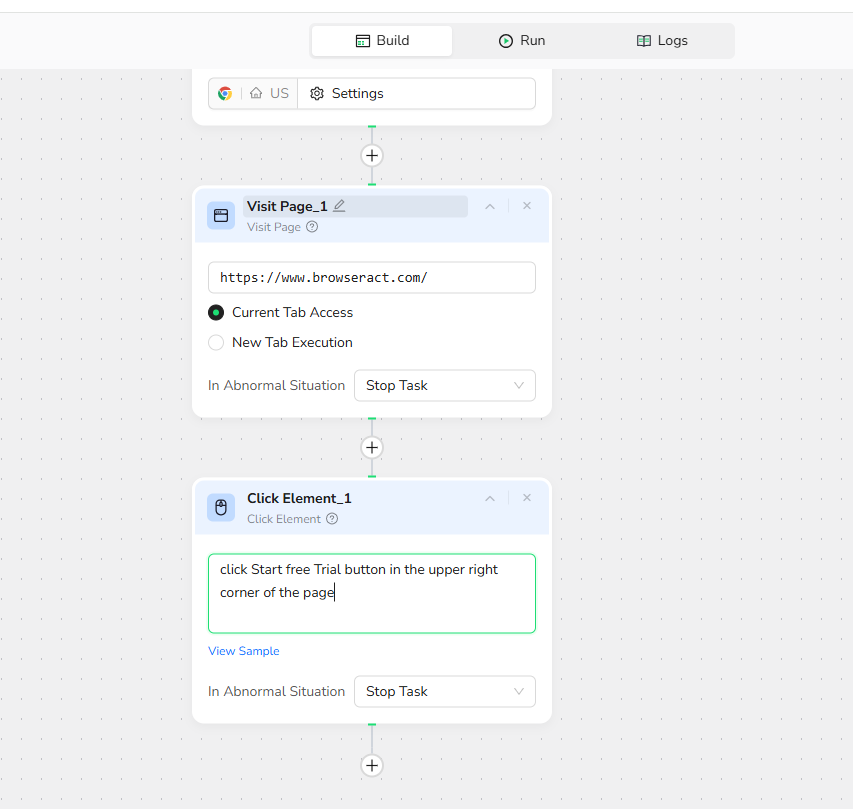
Goal: Click the search button on a website to trigger a search query.
Step 1: Add Visit Page node
- URL:
https://www.browseract.com/ - Access Method: Current Tab Access
- Error Handling: Stop Task
Step 2: Add Click Element Node
- Element Description: Start free trial button in the upper right corner of the page
- Error Handling: Stop Task

Step 3: Add Next Steps
Continue with Extract Data or other nodes to process the search results.
Key Rules & Best Practices
Rules:
- Visible elements only — The Click Element node can only interact with elements currently visible in the viewport; It cannot click hidden or dynamically loaded elements that haven't appeared yet
- One click per execution — Each Click Element node performs only one click action; for multiple clicks, add multiple Click Element nodes
- Natural language required — Describe the element using clear, natural language or parameter references
Best Practices:
- Include element type: "button," "link," "icon," "checkbox," etc.
- Specify location: "upper right corner," "bottom of the form," "top navigation bar"
- Mention distinctive features: color, text label, size
- Use position references: "first," "second," "third," "next to"
- Be specific: "Blue 'Continue' button on the right side" is better than "Continue button"
Quick Review
· What does the Click Element node do?
· Can you click elements that are not visible in the viewport?
· How many clicks can one Click Element node perform?
· What information should you include in element descriptions?
· What language should you use for element descriptions?
Next Steps
The Click Element node is essential for interactive automation workflows—start building your first click automation now!
Need help?
· Check our documentation for more automation tips
· Join our Discord community for live support
· Email us at support@browseract.com
Relative Resources
Latest Resources

10 Killer AI Agent Skills That Are Dominating GitHub Now

How One Person Made $100K in 3 Days Selling OpenClaw Setups

Amazon Price Scraper: Monitor Competitor Pricing in Real-Time | No Coding Required


